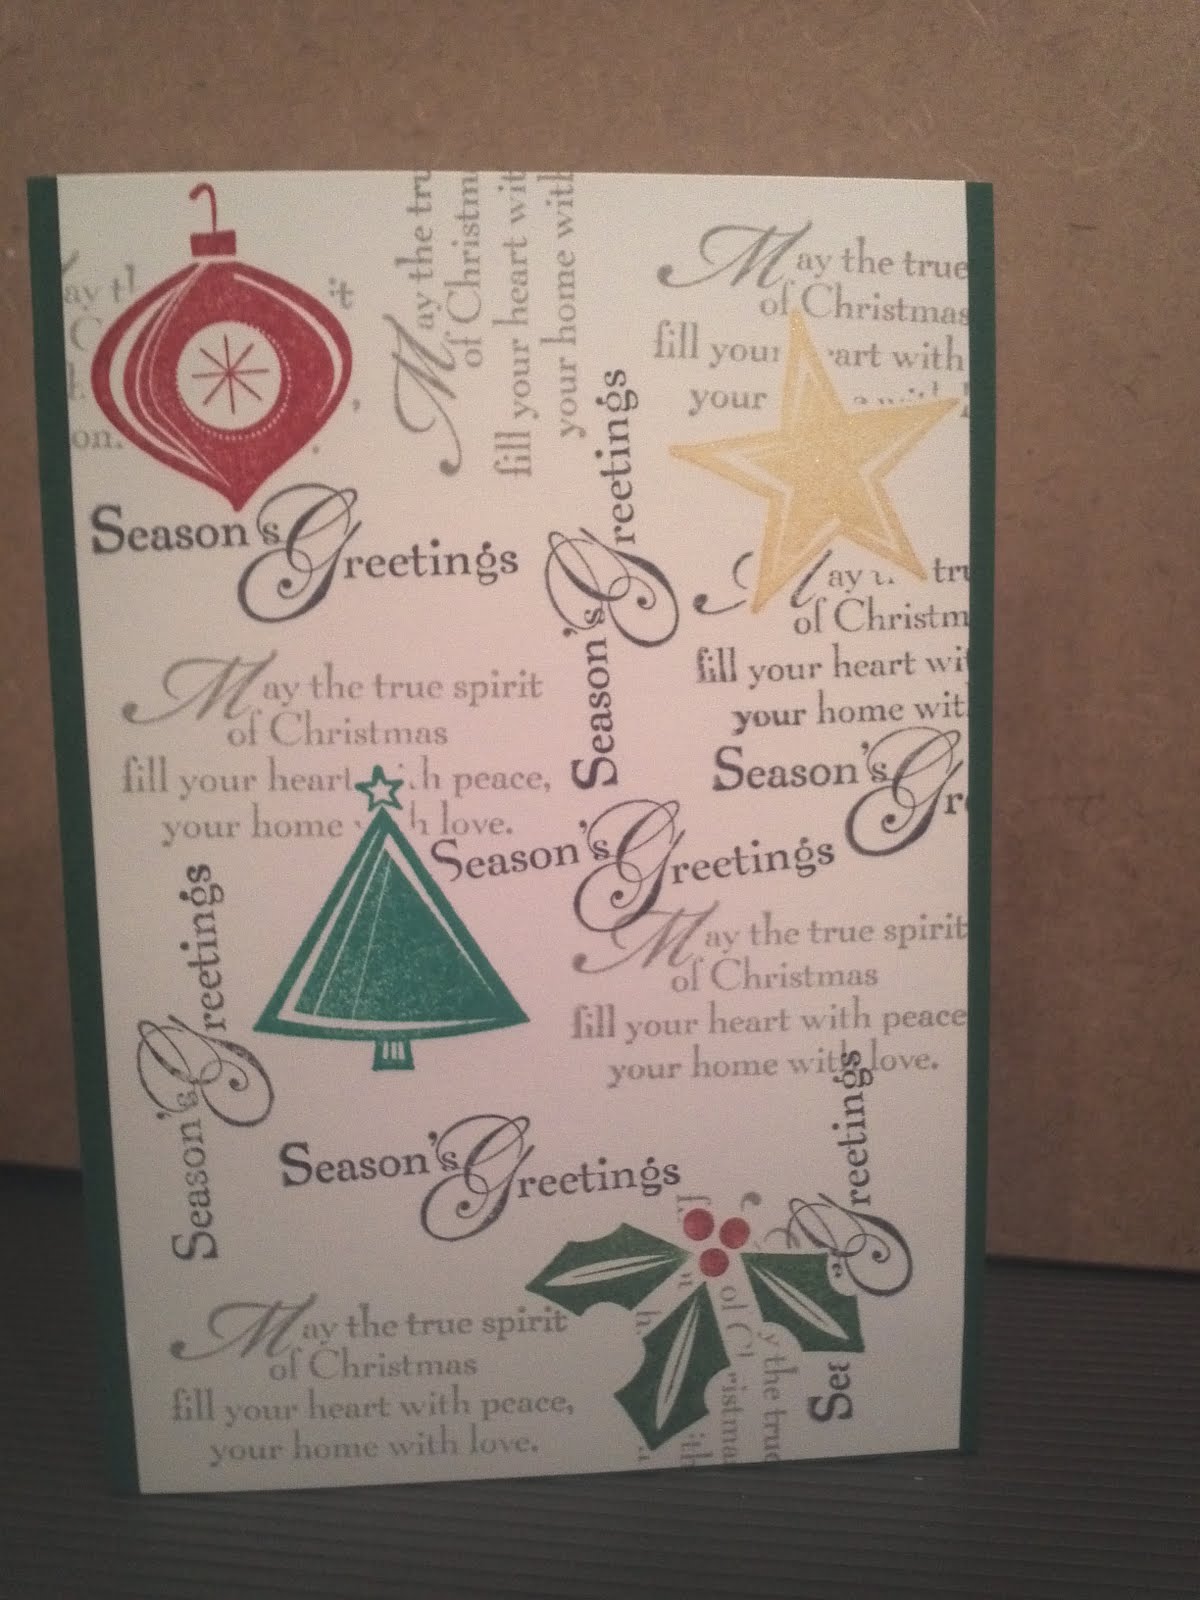
Spreekt voor zich denk ik.
De achtergrond is gemaakt met de tissue techniek. En had ik nog liggen.
Speaks for itselfs I guess.
The background is made with the Tissue technique. I made this one a while back.
Posts tonen met het label Kerstkaart. Alle posts tonen
donderdag 9 augustus 2012
Dag 353 Kerstkaart circles
Nieuwe kerststempel set, en daar maar eens mee gespeeld. Eindelijk deze set op Ebay gescoord. Ik heb gestempeld op parelmoer papier, en de stempel set gekleurd met stift.
Daarna de randjes gekleurd met een copic Spyca pen. Daardoor is er overal een klein beetje glitter. Op de foto niet erg goed zichtbaar.
New christmas stampset, and played with it.
I scored this set on Ebay, after a long search.
I stamped it on pearlpaper, and coloured it with Stabilo markers. Then I coloured the accents with Copic Spica pen.
Now there is just a little bit shimmer everywhere, but it doesn't really show on the picture.
Daarna de randjes gekleurd met een copic Spyca pen. Daardoor is er overal een klein beetje glitter. Op de foto niet erg goed zichtbaar.
New christmas stampset, and played with it.
I scored this set on Ebay, after a long search.
I stamped it on pearlpaper, and coloured it with Stabilo markers. Then I coloured the accents with Copic Spica pen.
Now there is just a little bit shimmer everywhere, but it doesn't really show on the picture.
zondag 5 augustus 2012
Dag 350 Kerstkaart
De hele dag ben ik bezig geweest met mijn monster project. In gebruik bleek het toch nog niet helemaal goed te werken, bovendien er zijn inmiddels weer wat stempelsets bij gekomen.
Daardoor had ik vanavond niet echt een idee wat ik moest maken.
Dus heb ik zoonlief van 15 gevraagd een stempelset uit te kiezen, en stempel inkt. Daarmee moest ik een kaart maken. Voor de achtergrond (een technique Junkie techniek) heb ik nog distress inkt gebruikt. Maar verder heb ik me beperkt tot zijn keuzes. Want niet alleen koos hij de stempelset, het moest ook met de pinguin.
Busy all day with my monster project. In reality it did not turn out as it should. Plus a couple of new stamp sets arrived.
That's why I didn't have a single idea what to make. So I asked my 15-year old son to pick a stamp set and the ink and created a card with that. For the background I used distress ink for applying a Technique Junkie technique, but that was the only digression from his choices: He did not only choose the stamp set but also insisted on the penguin.
Daardoor had ik vanavond niet echt een idee wat ik moest maken.
Dus heb ik zoonlief van 15 gevraagd een stempelset uit te kiezen, en stempel inkt. Daarmee moest ik een kaart maken. Voor de achtergrond (een technique Junkie techniek) heb ik nog distress inkt gebruikt. Maar verder heb ik me beperkt tot zijn keuzes. Want niet alleen koos hij de stempelset, het moest ook met de pinguin.
Busy all day with my monster project. In reality it did not turn out as it should. Plus a couple of new stamp sets arrived.
That's why I didn't have a single idea what to make. So I asked my 15-year old son to pick a stamp set and the ink and created a card with that. For the background I used distress ink for applying a Technique Junkie technique, but that was the only digression from his choices: He did not only choose the stamp set but also insisted on the penguin.
maandag 30 juli 2012
Dag 344 Kerstkaart 7
Ook vandaag weer een kaartje met dezelfde stempel.
Deze keer heb ik de stempel op krimpfolie gestempeld, en aan de achterkant ingekleurd, en met de heattool verkleind.
Today again a card with the same stamp.
This time I stamped on a piece of shrink foil. I coloured on the back. Then I used the heattool for shrinking.
Deze keer heb ik de stempel op krimpfolie gestempeld, en aan de achterkant ingekleurd, en met de heattool verkleind.
Today again a card with the same stamp.
This time I stamped on a piece of shrink foil. I coloured on the back. Then I used the heattool for shrinking.
vrijdag 27 juli 2012
Dag 341 Kerstkaart 5
Nog een kaart met dezelfde stempel. Dit is een techniek die ik op internet gevonden heb. Maar ik denk dat het een oudere techniek is , dat is wat er gezegd wordt op het filmpje Werkte erg goed bij deze stempel.
Another card with the same stamp. This is a technique I found on the internet. I think it is an older technique, that is what is said on the movie anyway.
It works great with this stamp.
Another card with the same stamp. This is a technique I found on the internet. I think it is an older technique, that is what is said on the movie anyway.
It works great with this stamp.
donderdag 26 juli 2012
Dag 340 Nog een kerstkaart
Nog een kerstkaart met dezelfde stempel.
Deze is ingekleurd met glitter en flock.
Another christmas card with the same stamp.
This one is coloured with glitter and flock
Deze is ingekleurd met glitter en flock.
Another christmas card with the same stamp.
This one is coloured with glitter and flock
woensdag 25 juli 2012
Dag 338 Kerstkaart
Vandaag kostte het veel moeite om een kaartje te maken. Ik had eea te doen, vond een mooi boek , en het was warm, erg warm.
Het idee had ik wel, meerdere zelfs.
Ik heb dezelfde stempel gebruikt als gisteren. Nu heb ik de grote ster uit gesneden. Daar achter heb ik, mbv foam tape, een kerstafbeelding geplakt gemaakt met stickers en kralen.
Today it was hard to make a card. I had some things to doe, I found a beautiful book to read, and it was warm, very warm today.
I did have an idea, more than one.
I used the same stamp I used yesterday. Now I cut out the big star.
In the opening I attached an image made with peel offs and beads. I used foam tape to get some dimension to the card.
Het idee had ik wel, meerdere zelfs.
Ik heb dezelfde stempel gebruikt als gisteren. Nu heb ik de grote ster uit gesneden. Daar achter heb ik, mbv foam tape, een kerstafbeelding geplakt gemaakt met stickers en kralen.
Today it was hard to make a card. I had some things to doe, I found a beautiful book to read, and it was warm, very warm today.
I did have an idea, more than one.
I used the same stamp I used yesterday. Now I cut out the big star.
In the opening I attached an image made with peel offs and beads. I used foam tape to get some dimension to the card.
vrijdag 22 juni 2012
Dag 307 Kerstkaart
Een tijdje terug heb ik me voorgenomen om van elke nieuwe techniek die ik leerde een kerstkaart te maken. Vandaag heb ik dat gedaan met de Te gekke krijtjes.
Eigenlijk heb ik 2 kerstkaartjes gemaakt, maar 1 ligt nog te drogen.
Deze is gemaakt met de stempels die ik op de Bijenmarkt in Leiden bij Inkerbelstamps heb gekocht. Geweldige kerststempels zijn dat.
Ik heb de stempel ingekleurd met paper piecing. Ook een van mijn favoriete technieken. De achtergrond is gemaakt met de Te gekke krijtjes.
A while back I I decided that I would make a christmas card with every new technique I would pick up. Today I made a christmas card with the 'te gekke krijtjes'. Actually I made two, but one is still drying.
This one I made with the stamps I bought on the Beemarket from Inkerbel stamps. Great christmas cards these are.
I coloured the stamp with Paper Piecing, one of my favorite techniques.
Eigenlijk heb ik 2 kerstkaartjes gemaakt, maar 1 ligt nog te drogen.
Deze is gemaakt met de stempels die ik op de Bijenmarkt in Leiden bij Inkerbelstamps heb gekocht. Geweldige kerststempels zijn dat.
Ik heb de stempel ingekleurd met paper piecing. Ook een van mijn favoriete technieken. De achtergrond is gemaakt met de Te gekke krijtjes.
A while back I I decided that I would make a christmas card with every new technique I would pick up. Today I made a christmas card with the 'te gekke krijtjes'. Actually I made two, but one is still drying.
This one I made with the stamps I bought on the Beemarket from Inkerbel stamps. Great christmas cards these are.
I coloured the stamp with Paper Piecing, one of my favorite techniques.
zondag 10 juni 2012
Dag 297 Kerstkaart
Na een heel gepriegel met kraaltjes vraag ik me echt af waarom ik nooit iets eenvoudigs en snels bedenk. Maar ja, als het dan weer af is, ben ik zo blij met het resultaat dat ik weer opnieuw iets verzin dat veel werk is.
De achtergrond is gemaakt met Goosebumps shimmer. Op de foto laat het zich niet goed zien, maar de achtergrond heeft een heel lichte glans. Deze Goosebumps zijn geweldig als resist.
Bij het sponsen met Distress inkt bleef de Goosebump prachtig wit.
Daarna heb ik de achtergrond bestempeld met een stempelwiel. En opzij gelegd omdat ik nog niet goed wist hoe ik de kaart wilde afmaken.
En toen kwam ik, bij een rondje boekhandel, een boek tegen over het maken van embellishments met kraaltjes en zilverdraad. Zo leuk, en na het systeem door te hebben dacht ik dat het mogelijk moest zijn om een kerstster te maken voor op de kerstachtergrond.
Het kostte een beetje puzzelwerk, en een heleboel gepruts met kraaltjes, maar het is gelukt.
De tekst is een Inkerbel stempel, die ik gisteren op de Bijenmarkt in Leiden heb gekocht. Ik vrees dat er meer Inkerbel stempels hun weg naar Texel gaan vinden, want ik heb weer een paar heeeel erg mooie gezien.
After a lot of fiddling with beads I really wonder why I never can think of something which is easy and quick. But when it is finished, I mostly are so pleased with the result that I think of something else to make, what is just as much fiddling.
The background is made with Goosebumps Shimmer. You can not see it really well on the picture, but this card really has a little shimmer. This Goosebumps is a real good resist.
When sponging with Distress ink, the Goosebumps didn't take up any ink at all!.
Then I stamped the card with a stamp wheel, and put it aside because I didn't know how to finish the card right away.
Then I found, when I did a little window shopping in the local bookstore, a book about making embellishments with beads. I love this! And after understanding the basics, I thought it must be possible to make a poinsettia. It took a lot of trial and error, and even more fiddling, but I managed!
The sentiment is a Inkerbel stamp, which I bought yesterday when I was on the bee market in Leiden. |I am afraid more Inkerbel stamps will find their way to Texel, because I saw a lot of beautiful stamps yesterday..
De achtergrond is gemaakt met Goosebumps shimmer. Op de foto laat het zich niet goed zien, maar de achtergrond heeft een heel lichte glans. Deze Goosebumps zijn geweldig als resist.
Bij het sponsen met Distress inkt bleef de Goosebump prachtig wit.
Daarna heb ik de achtergrond bestempeld met een stempelwiel. En opzij gelegd omdat ik nog niet goed wist hoe ik de kaart wilde afmaken.
En toen kwam ik, bij een rondje boekhandel, een boek tegen over het maken van embellishments met kraaltjes en zilverdraad. Zo leuk, en na het systeem door te hebben dacht ik dat het mogelijk moest zijn om een kerstster te maken voor op de kerstachtergrond.
Het kostte een beetje puzzelwerk, en een heleboel gepruts met kraaltjes, maar het is gelukt.
De tekst is een Inkerbel stempel, die ik gisteren op de Bijenmarkt in Leiden heb gekocht. Ik vrees dat er meer Inkerbel stempels hun weg naar Texel gaan vinden, want ik heb weer een paar heeeel erg mooie gezien.
After a lot of fiddling with beads I really wonder why I never can think of something which is easy and quick. But when it is finished, I mostly are so pleased with the result that I think of something else to make, what is just as much fiddling.
The background is made with Goosebumps Shimmer. You can not see it really well on the picture, but this card really has a little shimmer. This Goosebumps is a real good resist.
When sponging with Distress ink, the Goosebumps didn't take up any ink at all!.
Then I stamped the card with a stamp wheel, and put it aside because I didn't know how to finish the card right away.
Then I found, when I did a little window shopping in the local bookstore, a book about making embellishments with beads. I love this! And after understanding the basics, I thought it must be possible to make a poinsettia. It took a lot of trial and error, and even more fiddling, but I managed!
The sentiment is a Inkerbel stamp, which I bought yesterday when I was on the bee market in Leiden. |I am afraid more Inkerbel stamps will find their way to Texel, because I saw a lot of beautiful stamps yesterday..
Labels:
beads,
Christmas card,
goosebumps,
Kerstkaart,
kralen
dinsdag 29 mei 2012
Dag 285 Filigraan /Quilling
Al een tijdje heb ik zin in een filigraan kaartje, maar het komt er steeds niet van. Vanavond heb ik een filigraan engeltje gemaakt, En daarna in een treatcup gezet om het heel te kunnen versturen.
I felt like quilling for a while now, and finally tonight I made an angel. And then I put it in a treatcup for sending.
donderdag 17 mei 2012
DAG 272 Sneeuwvlok
Nog maar een kerstkaartje. Met alles waar ik nu mee bezig ben, kon ik straks wel eens geen tijd hebben om kerstkaartjes te maken.
De achtergrond is gemaakt met een Technique Junkie techniek. Chalk techniek. Ik vind het leuk om te doen, en heb een hele serie achtergronden gemaakt een tijdje terug, en daar heb ik vanavond een kaartje mee gemaakt.
De vilten sneeuwvlok vond ik bij het opruimen, en dat ik daar een kaart mee wilde maken, wist ik gelijk. Wat precies was nog onduidelijk. Dus zwierf hij een tijdje over tafel. Vanavond kon ik ineens beiden combineren.
Het label is geponsd uit kraft cardstock, en gesponsd met distress inkt, en daarna een beetje wit met de Direct to Paper techniek, en op die manier een wit randje gemaakt.
Tekst gestempeld en daarna het label opgeplakt.
De vilten sneeuwvlok met een sneeuwvlok brad vastgemaakt, zodat de ontvanger die sneeuwvlok van de kaart kan halen, en in de kerstboom kan hangen.
Another christmascard. With all I am planning at this moment, I hope I will not have lots of time left to make christmas cards later this year.
I made the background using a Technique Junkies technique. A technique with chalk. I love playing with chalk, and made a few backgrounds a while back, and used one of these tonight.
The felt snowflake was somewhere in my stash. I found it when I was cleaning, and knew I wanted to make a card with it. But, not knowing what to make exactly, the snowflake wondered over my table the last few days.
Tonight I suddenly knew how to combine the two things.
The label is punched out Kraft cardstock, and sponged with distress ink. Then I whitened it a bit, with the direct to paper technique. I made a white border that way.
I stamped the sentiment and attached the label to the card.
I attached the felt snowflake with a brad. Now the receiver can take the snowflake of the card, and put it in the christmas tree.
maandag 30 april 2012
Dag 254 Kerstkaart
Bij het opruimen en reorganiseren vond ik mijn paper cast mallen terug. Het zat al een tijdje in mijn hoofd dat ik met paper cast wilde spelen en dat ik mijn mallen tevoorschijn moest halen. En toen ik ze tegen kwam bij het opruimen was dat een goed moment. Dus heb ik de kerstmallen er gelijk uit gezocht en apart gelegd.
Afgelopen vrijdag heb ik heerlijk met papierpulp en water zitten kliederen. Alles te drogen gelegd, en gisteren de eerste serie uit de mallen gehaald. Niet alle mallen zijn even dik, en de ene mal is natter gebleven dan de ander. Niet alles is dus tegelijk droog.
Vanavond de eerst gekleurd met aquarelverf en glitter aquarel. Accenten aangebracht met Perfect Pearls, en een piek van glitter.
tekst is van Stampin Up, gestempeld met versamark en ge-embossed met vanille embossingpoeder.
When cleaning and re-oganising my stash I re-discoverd my Paper Cast molds. It was in my mind for a few weeks that I wanted to play with paper cast again, and finding the molds seemed like a good time to accually do so.
So when re-organising the molds, I kept out the christmas molds, and put them aside.
Last friday I have been playing with paper pulp and water. Then I put the molds to dry. Because not every mold has the same dept, and when I filled the molds net evenly wet, the paper cast will not be dry all at the same time.
Tonight I coloured the first with watercolour paint and shimmer paint.I made some accents with Perfect Pearls, and the top of the christmas tree is made with glitter.
The sentiment is Stampin Up, I stamped it with Versamark, and heat embossed it in Vanilla
Labels:
aquarelverf,
Christmas card,
Kerstkaart,
Paper cast,
watercolour
maandag 12 maart 2012
Dag 208 kerstkaart.
Simpel kaartje. Op het kaartje sneeuwvlokken gestempeld met de season distress inkset.
De rode gebruikt om een kerstbal te stempelen.
Nog een tekst gestempeld met versafine. De kerstballen en de tekst uitgeponsd. Alles op de kaart geplakt. Ik had nog vaag het plan om er strikjes op te maken maar een proefje was niet mooi, dus maar zo gelaten.
A real simple card. On the card I stamped snowflakes with the season distress ink.
I used the red one to stamp a ornament.
Stamped a sentiment with versafine. Punched out the ornamants and sentiment. Attached everything to the card.
I thought about making a bow on the ornaments, but a test was not good, so I left that out.
De rode gebruikt om een kerstbal te stempelen.
Nog een tekst gestempeld met versafine. De kerstballen en de tekst uitgeponsd. Alles op de kaart geplakt. Ik had nog vaag het plan om er strikjes op te maken maar een proefje was niet mooi, dus maar zo gelaten.
A real simple card. On the card I stamped snowflakes with the season distress ink.
I used the red one to stamp a ornament.
Stamped a sentiment with versafine. Punched out the ornamants and sentiment. Attached everything to the card.
I thought about making a bow on the ornaments, but a test was not good, so I left that out.
woensdag 29 februari 2012
Dag 196 Kerstkaart.
Stampin Up heeft doolhofspelletjes voor op een kaart. Helemaal te gek gaaf vind ik dat. Natuurlijk kan ik niet gewoon de bijbehorende stempels gebruiken maar popte er gelijk een kerstkaart in mijn hoofd toen ik dat zag.
Vanavond de tijd genomen om er 1 te maken. Heel erg CAS, maar zeer goed gekeurd door mijn kinderen. Dus ik plaats hem toch maar.
Achter het spelletje heb ik een huisje met boompjes in de sneeuw gestempeld. Boom en Huisje zijn uit twee verschillende sets. Daarna uitgeponst en achter het spelletje geklemd.
Het geheel om een kaart geplakt, en van 2 sentiments 1 sentiment gemaakt. Die ook uitgeponsd en opgeplakt.
Stempel: Huis en boom Stampin up
Eerste deel van de tekst Stampin Up
Christmas- Freebie
Stampin up designed a maze game for cards. I am very exited about that. But of course I can not make a simple card, using the stamps which come with the maze game. I had to make a christmas card.
It became very CAS, but my teenagers thought it was awesome, so I still post this card.
Behind the maze game I stamped a house and trees in the snow. Using two different stamps for that.
Then I punched it out and put it behind the maze game, and attached the game to the card, using scoretape.
I made a sentiment out of 2 sentiment stamps, punched it out, and finished the card.
Vanavond de tijd genomen om er 1 te maken. Heel erg CAS, maar zeer goed gekeurd door mijn kinderen. Dus ik plaats hem toch maar.
Achter het spelletje heb ik een huisje met boompjes in de sneeuw gestempeld. Boom en Huisje zijn uit twee verschillende sets. Daarna uitgeponst en achter het spelletje geklemd.
Het geheel om een kaart geplakt, en van 2 sentiments 1 sentiment gemaakt. Die ook uitgeponsd en opgeplakt.
Stempel: Huis en boom Stampin up
Eerste deel van de tekst Stampin Up
Christmas- Freebie
Stampin up designed a maze game for cards. I am very exited about that. But of course I can not make a simple card, using the stamps which come with the maze game. I had to make a christmas card.
It became very CAS, but my teenagers thought it was awesome, so I still post this card.
Behind the maze game I stamped a house and trees in the snow. Using two different stamps for that.
Then I punched it out and put it behind the maze game, and attached the game to the card, using scoretape.
I made a sentiment out of 2 sentiment stamps, punched it out, and finished the card.
donderdag 9 februari 2012
dag 176 Kerstkaart
Met elke nieuwe techniek die ik leer wil ik, minstens, 1 kerstkaart maken. En toen deze mini kerstset van de week binnenkwam kon dat heel goed samengevoegd worden.
Voor het tafeleel heb ik eerst maskers geknipt, 1 van de sneeuwman, en een serie kerstbomen.
Daarna heb ik eerst de sneeuwman gestempeld,die gemaskerd, en de bomen er omheen gestempeld, steeds de gestempelde boom gemaskerd. en daarom heen de bomen.En met grijsblauwe distress inkt gesponsed. En daar nog sneeuwvlokken over gestempeld.
De voorgrond heb ik eerst met inkrefeshener besproeid. Ik zag vanmorgen een tutorial van Tim Holtz, en dacht dat dat een mooie toevoeing aan deze techniek zou zijn.
Daarna heb ik het papier ook gesponsed, met dezelfde inkt als de kaart.
Ik heb een raam uitgescheurd, en met 3 touwtjes vast gemaakt.
Kaarten op elkaar geplakt, en daarna nog een sentiment gestempeld en uitgeponst.
I want to make at least one christmas card with every new technique I learn. And when this mini set of stamps arrived this week, I thought it could combine those two.
For the scenery I have first cut out a lot of masks. One snowman, and a lot of trees. Then I stamped the snowman, masked it, and stamped the tree around it. Masking each one when I went along. Then I sponged it with gray/blue distress ink.
\For the front I sprayed inkrefreshener over a piece of white cardstock I saw a Tim Holtz tutorial this morning, and thought this would make a good extra to this techniek.
I sponged the same distress ink over the front. teared a window out of the cardstock, rolled it, and fastened it with 3 pieces of scrappers floss.
I glued the cards together, stamped a sentiment, punched it out, and glued it in the corner.
Voor het tafeleel heb ik eerst maskers geknipt, 1 van de sneeuwman, en een serie kerstbomen.
Daarna heb ik eerst de sneeuwman gestempeld,die gemaskerd, en de bomen er omheen gestempeld, steeds de gestempelde boom gemaskerd. en daarom heen de bomen.En met grijsblauwe distress inkt gesponsed. En daar nog sneeuwvlokken over gestempeld.
De voorgrond heb ik eerst met inkrefeshener besproeid. Ik zag vanmorgen een tutorial van Tim Holtz, en dacht dat dat een mooie toevoeing aan deze techniek zou zijn.
Daarna heb ik het papier ook gesponsed, met dezelfde inkt als de kaart.
Ik heb een raam uitgescheurd, en met 3 touwtjes vast gemaakt.
Kaarten op elkaar geplakt, en daarna nog een sentiment gestempeld en uitgeponst.
I want to make at least one christmas card with every new technique I learn. And when this mini set of stamps arrived this week, I thought it could combine those two.
For the scenery I have first cut out a lot of masks. One snowman, and a lot of trees. Then I stamped the snowman, masked it, and stamped the tree around it. Masking each one when I went along. Then I sponged it with gray/blue distress ink.
\For the front I sprayed inkrefreshener over a piece of white cardstock I saw a Tim Holtz tutorial this morning, and thought this would make a good extra to this techniek.
I sponged the same distress ink over the front. teared a window out of the cardstock, rolled it, and fastened it with 3 pieces of scrappers floss.
I glued the cards together, stamped a sentiment, punched it out, and glued it in the corner.
zondag 29 januari 2012
Dag 166 Nog een kerstkaart
Toen ik bezig was met de Masked Sentiment kaart, kreeg ik nog een ander idee.
Ik heb eerst de auto gestempeld met rood, en de inkt laten uitlopen mbv een blender pen.
Daarna de auto gemaskerd en de kerstboom er in gestempeld. Het masker verwijderd en de auto uitknipt.
Daarne de auto op de kaart gelegd, en het eerste sentiment gestempeld. In diep rood (cherry cobbler) Zo kwam het sentiment en auto precies goed op de kaart. Daarna heb ik de kaart verder vol gestempeld met het zelfde sentiment in licht grijs.
Tenslotte de auto er met foamtape op geplakt.
While I was making the Masked Sentiment card, I thougt of an variation.
First I stamped the car in red, and coloured the car in with the ink, using a blender pen. This is a controled way to let the ink bleed.
I masked the car, and stamped the tree so it is inside the car. I removed the mask and cut the car.
Then I layed the car on the card,and positioned the first sentiment, which I stamped in red (cherry cobbler) This way the sentiment was in the right place when I finished the card. I stamped the card full with the same sentiment in a very light gray.
I finished the card by attaching the car on the card with foamtape.
Ik heb eerst de auto gestempeld met rood, en de inkt laten uitlopen mbv een blender pen.
Daarna de auto gemaskerd en de kerstboom er in gestempeld. Het masker verwijderd en de auto uitknipt.
Daarne de auto op de kaart gelegd, en het eerste sentiment gestempeld. In diep rood (cherry cobbler) Zo kwam het sentiment en auto precies goed op de kaart. Daarna heb ik de kaart verder vol gestempeld met het zelfde sentiment in licht grijs.
Tenslotte de auto er met foamtape op geplakt.
While I was making the Masked Sentiment card, I thougt of an variation.
First I stamped the car in red, and coloured the car in with the ink, using a blender pen. This is a controled way to let the ink bleed.
I masked the car, and stamped the tree so it is inside the car. I removed the mask and cut the car.
Then I layed the car on the card,and positioned the first sentiment, which I stamped in red (cherry cobbler) This way the sentiment was in the right place when I finished the card. I stamped the card full with the same sentiment in a very light gray.
I finished the card by attaching the car on the card with foamtape.
zaterdag 28 januari 2012
Dag 165 Kerstkaart
De techniek van masked sentiments, bevalt me zo goed, dat ik er nog een kaartje mee heb gemaakt. En omdat ik dit jaar allemaal verschillende kerstkaarten wil maken, gelijk maar een kerstkaart. Volgens mijn lief ben ik gek dat ik nu al kerstkaarten maak. Ik denk dat je niet vroeg genoeg kun beginnen.
I like the Masked Sentiments technique so much, that I made another card in this technique. And because I want to make all kind of christmas cards this year, I made a christmas card.
My sweetheart thinks I am crazy, to think about christmas cards already, but you can not be early enought in my opinion.
I like the Masked Sentiments technique so much, that I made another card in this technique. And because I want to make all kind of christmas cards this year, I made a christmas card.
My sweetheart thinks I am crazy, to think about christmas cards already, but you can not be early enought in my opinion.
zondag 18 december 2011
Dag 128 Kerstkaart
Dit was me een dagje wel. Geheel anders dan gepland. In plaats van een rustig dagje, werd het een dagje aanpoten. Waardoor de kerstkaarten nog steeds niet op de bus zijn. Maar er wel gordijnen hangen, de kamer opgeruimd (nou ja, opgeruimder dan hij was) de kerstboom staat,nog niet versierd, maar toch.
En toen hadden we ook nog ineens een eetfeestje.
En dan nog een kaartje gemaakt voor dit blog. De basis had ik gisteren al gemaakt, maar geen idee hoe ik het verder moest maken. Vanavond had ik het kaartje in mijn handen, en ineens 'zag' ik het.
Toen was het kaartje snel klaar.
De 'bal' is geembossed met Judikins embossingpoeder, en het schittert je tegemoet. Helaas kreeg ik dat niet goed op de foto.
De achtergrond van de bal is gestempeld met een stempelwiel, en een Big and juicy.
Het label is gestempeld met een clear stamp van een onbekend merk.
The day went by, totally different than planned. In stead of a quiet day, it became a day filled with housework. The christmas cards, are still not finished, but the curtains, are in place, the christmas tree is in its place. Not yet decorated, but still.
And we had an instand dinnerparty.
I did manage to make a card for this blog. The base I made yesterday, but I had not a clue how to finish it. Tonight I looked at the card, and 'saw' it.
The card was really quick finished then.
The 'ball' is embossed with Judikins embossingpowder, and is very shiny. I couldnt get that good on the picture.
The background is stamped with a stampwheel, and a big and juicy.
The label is stamped with a clearstamp from an unkown company.
En toen hadden we ook nog ineens een eetfeestje.
En dan nog een kaartje gemaakt voor dit blog. De basis had ik gisteren al gemaakt, maar geen idee hoe ik het verder moest maken. Vanavond had ik het kaartje in mijn handen, en ineens 'zag' ik het.
Toen was het kaartje snel klaar.
De 'bal' is geembossed met Judikins embossingpoeder, en het schittert je tegemoet. Helaas kreeg ik dat niet goed op de foto.
De achtergrond van de bal is gestempeld met een stempelwiel, en een Big and juicy.
Het label is gestempeld met een clear stamp van een onbekend merk.
The day went by, totally different than planned. In stead of a quiet day, it became a day filled with housework. The christmas cards, are still not finished, but the curtains, are in place, the christmas tree is in its place. Not yet decorated, but still.
And we had an instand dinnerparty.
I did manage to make a card for this blog. The base I made yesterday, but I had not a clue how to finish it. Tonight I looked at the card, and 'saw' it.
The card was really quick finished then.
The 'ball' is embossed with Judikins embossingpowder, and is very shiny. I couldnt get that good on the picture.
The background is stamped with a stampwheel, and a big and juicy.
The label is stamped with a clearstamp from an unkown company.
Abonneren op:
Posts (Atom)